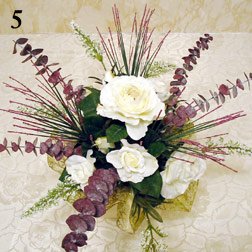
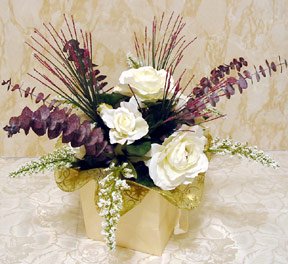
How to Make This Stylish
Silk Flower Centerpiece
in Five Easy, Simple Steps
You can make this stylish silk flower centerpiece in just a few easy, simple steps with these FREE ONLINE photo-illustrated, step-by-step instructions.
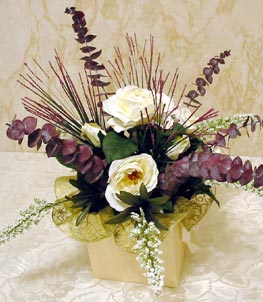
This charming, do-it-yourself, white and purple silk flower arrangement
makes a wonderful centerpiece for Engagement Party, Anniversary, Bridal
Shower, Wedding Reception, or any celebration that calls for floral
decoration.
There are also tips on special artificial flower
manufacturing details to look for that can make your own silk floral
arrangements look more lifelike and natural.
Knowing these
special details, you can buy the best quality, most realistic silk
flowers and artificial floral products for your money.
An Easy, Quick Start
in Silk Flower Arranging
Even if you are a newcomer to silk floral arranging, here's a fast way to get started without becoming confused or overwhelmed.
If
you are looking for a quick, uncomplicated do-it-yourself silk flower
centerpiece idea, this artificial flower table arrangement is EASY and
ECONOMICAL to make.
There are ONLY FIVE STEPS to making this chic silk floral design!
The
number of components used here are minimal, in order to be as
economical and simple as possible but still create a very pleasing silk
flower centerpiece.
And of course, you can substitute your own
choice of container, silk flower stems and colors as desired. By all
means, if you want to use more stems to make a fuller bouquet, go right
ahead!
Clicking on most pictures on this page
will open a large image for
closer inspection in a new window.
Now, the fun begins with a look at...
Items Used to Make This
Silk Flower Centerpiece
Below
are pictures of the products used in the making of this silk reception
table arrangement, with tips about the special manufacturing details to
look for that can add a more realistic presence to any silk flower
centerpiece.
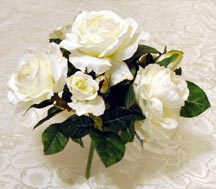
WHITE ROSE SILK FLORAL BUSH (1)
This is an excellent example of a
good quality, very natural-looking white Rose silk floral bush, of
approximately ten inches diameter. It has ten Rose blossoms in various
stages, from bud to palm-sized full bloom.
What special manufacturing details make this attractive pre-made Rose bouquet so lifelike?
Click on the picture for a closer look. You can see a slight discoloration on the edges of some Rose petals.
Also,
notice the foliage detail — the leaf texture, the fine tracery of
veins, the realistic leaf edges which also show some browning.
It's details like these that can fool the eye, and make this artificial pre-made Rose bouquet a real winner!
TIP:
With some ribbon and bead or pearl accents, this quality silk Rose
floral bush could make a fine wedding throw bouquet. Or, it could serve
as an excellent, almost ready-made starting point for making your own
silk Rose bridal bouquet.
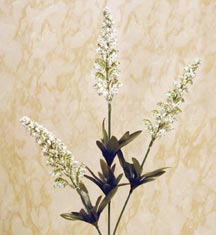
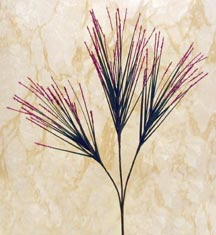
FOXGLOVE (White, 2 Stems) and
MEADOW WISP (Purple, 1 Stem)
Click
on the pictures below for a close-up look at the blossom parts of these
silk flower stems. (Foxglove left, Meadow Wisp right).
These stems incorporate a special artificial flower manufacturing
process called 'flocking.' The flocking substance is basically a
colored, fine particle papier mache mixture which is sprayed or dipped
onto artificial flower components. (Papier mache is a material made from
paper pulp or shreds of paper, mixed with glue or paste.)
The realistic texture heightens the authenticity and visual interest of this simple silk flower centerpiece.
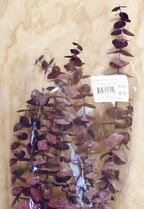
NATURAL EUCALYPTUS
Purple (5 Stems)
Natural Eucalyptus is
available in a wide range of color shades. One way this is achieved is
by soaking the stems in a bucket of dye-colored water, which is then
absorbed upward throughout the branch and leaves. The color may fade as
weeks pass and the Eucalyptus dries out.
The number of stems in a package can vary, averaging about 10-12 per bag. Check for broken tips before purchasing.
Note:
The minty scent of natural Eucalyptus can be disagreeable to some
people. Scent-free, artificial Eucalyptus is available, but in a limited
color range — usually shades of rusty red or mossy green.
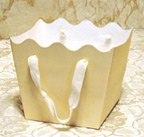
STURDY PAPER BASKET CONTAINER
Beige with White Fabric Handles
Not quite cardboard, this heavyweight paper ‘basket’ is foldable and fairly durable but can tear if handled carelessly.
This
container is approximately 7 inches high x 8 inches wide at the top.
Notice that the top edges have an artistic scalloped design on two
sides. The woven fabric side handles are an interesting accent.
Although
rarely considered as a floral display container, a sturdy paper-based
receptacle may be a good, 'cheap' alternative to plastic or glass
containers.
In this case, it imparts a casual note to this silk flower centerpiece design. What do you think?
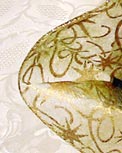
ROUND GAUZE DOILY SKIRT
Light Green with Gold Accents
Here's
something different and unusual in a silk flower centerpiece! A gold and
green transparent gauze skirt dresses the container, and adds festive
flair and a pinch of sparkling glamor to this simple silk flower
arrangement, without stealing the show.
It is approximately 15 inches in diameter.

STYROFOAM
Styrofoam bricks, blocks and sheets come in different thicknesses and
sizes, in either green or white color. Depending on what you find
available, and what type of container you use, you will have to estimate
how much to buy. Use a metal knife with serrated blade to trim as
needed.
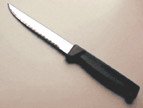
METAL KNIFE With Serrated Edge
To trim styrofoam.
A steak or butter knife is fine.
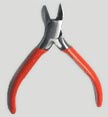
CUTTING PLIERS
To trim silk flower stems.
Scissors are NOT recommended.
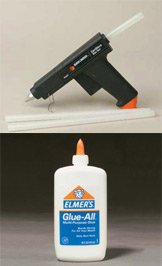
HOT GLUE GUN or Other GLUE
A hot glue gun was used to secure the
styrofoam blocks, but any type of glue that is safe to use with
styrofoam, with good bonding properties, can be used instead.
Glue
will not be required for bonding anything else, unless you wish to make
a more durable arrangement by putting a touch of glue on the ends of
stems before inserting them into the styrofoam.
NOW, Let's Make This Silk Flower Centerpiece!
ALWAYS THE FIRST STEP: Prepare a Container
I'm
sure you realize that a sturdy foundation is very important for every
floral arrangement. A firmly secured, well-anchored base is an absolute
must for optimal support, especially during transport.
If you prefer to use a vase, bowl or woven basket container instead, you can leave out the doily skirt and skip Step 1 below.
Instead, visit this article for tips, ideas and detailed instructions on
choosing and preparing a container
for a silk floral arrangement.
So, are you ready? Let's do it!
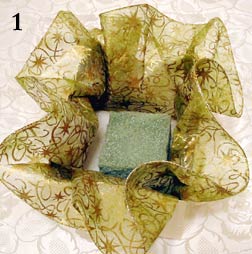
STEP 1
CONTAINER PREPARATION
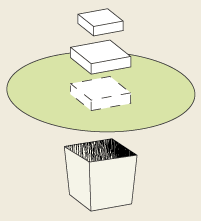
For
this silk flower centerpiece design, the deep container required three
pieces of styrofoam squares to set the silk Rose floral bush at proper
height. Best height is when bottom foliage slightly touches and
overhangs the container rim. Depending on the size and thickness of the
styrofoam (blocks, bricks, thick or thin sheets) you purchase, you may
need to use more or less.
First, trim the bottom two styrofoam blocks to fit almost touching the
inside container walls. This will help to minimize wobble and movement
during transportation of the completed silk flower centerpiece.
Glue
the first block to the container bottom. You don't need a lot of glue —
a spiral or zigzag squirt over a large area will do fine.
Next,
you'll need to experiment with placing the doily into the container,
centering and shaping it to make fairly uniform ruffles all around. This
may require some fussing and patience. When you are satisfied that the
ruffled edges extend pretty evenly on all sides, only THEN apply glue to
the second piece of styrofoam and press it firmly on top of the doily.
Hold for several seconds. The glue will seep through the gauze and bond
with the styrofoam underneath.
Finally, if needed for more
height, glue a third styrofoam block in place. This top block can be
smaller than the others. This allows us to insert stems into the SIDE
surfaces of the block, too. This smaller block will also be better
hidden and less visible under the foliage.
Note: Since the Rose
bush has a lot of leaves that give good coverage, moss was not used to
hide the styrofoam beneath. If you want to, you may do so at this point.
OK, now that you have prepared a container, we are ready to make the silk flower centerpiece!
Just
look at the pictures (click on each picture for a large view in a new
window) and follow the step by step instructions. You'll be done in no
time!
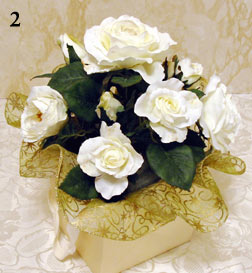
STEP 2
Spread apart and shape the Rose floral bush stems as best you can.
Insert in the center, pushing the stem at least one to two inches into
the styrofoam.
Remember, best height is when bottom foliage slightly touches and overhangs doily rim. (You checked this in Step 1, right?)
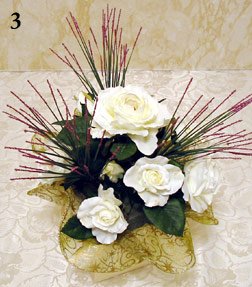
STEP 3
Measure and cut so Meadow Wisp blossoms extend about 3 inches beyond the Rose bush.
Position the 3 blossoms in a triangle pattern at about a 70 degree angle around the central Rose blossom.
The
Meadow Wisps I used were constructed of three wire stems hand-wrapped
together with floral tape by the manufacturer to create one unit. I
removed the tape and separated them so I could better place the parts
individually.
You can leave as one piece if desired. Insert main
stem near center of Rose bush, but you will need to manipulate the 3
blossoms into triangle position among the Roses and foliage.
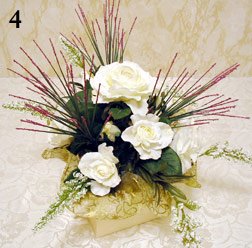
STEP 4
Insert a Foxglove stem on opposite sides at bottom of the silk flower centerpiece.
Unlike the meadow Wisps, these were manufactured as three wired plastic
stems connected to one main molded plastic stem. I inserted as one piece
and spread the three wired stems far apart, extending well out and
shaped to curve downward.
STEP 5
Select 5 branches of Eucalyptus. Measure lengths so branches
extend several inches beyond the Rose bush shape, a little further than
the meadow Wisps. Vary the lengths a bit.
Remove any leaves from stem base so there is at least 2 inches of bare branch to insert into the styrofoam.
Place in positions of your choice at varying angles (for example, from 40 to 60 degrees).
That's it — we're done!
Step
back and admire your simple, classy silk flower centerpiece table
arrangement. And practice accepting nice compliments on your work!
About This Silk Flower Centerpiece
I should mention, all the
design elements for this silk flower centerpiece were chosen by my
daughter and her friend, with no experience in silk floral arranging.
They only asked my advice on creating a minimal design AFTER purchasing the items...but they
reminded me of something:
There are no rules when it comes to exercising your own creativity.
For
instance, the cardboard container used in this silk flower centerpiece
is, to me, an unusual choice. The generally accepted 'rule' for pleasing
results is that the height of a floral arrangement should be at least
1.5x to 2x the height of the container. Here, the container is somewhat
oversized and boxy, and is almost the same height as the floral assembly
extending above.
And the doily skirt is an idea I had never
considered as part of a floral centerpiece. But it adds an understated
dash of glamor to offset the plain cardboard container.
For sure,
the combination is different and unusual — but it all seems to work in
this case. (See, rules don’t always matter as long as YOU and the
recipients are happy with the results!)
All in all, we made 14 of
these moderately priced, medium-sized silk flower centerpiece
arrangements, which received many compliments throughout the Engagement
celebration. Bravo, girls!
|
You're reading a SAMPLE from: |

Check out my 198-page book,
The Silk Flower Centerpiece Handbook:
A Course FOR IMPATIENT PEOPLE...
in a matter of DAYS, not months or years,
you'll know just about everything I've learned over 20 years!
FINALLY, An Economical, Easy-To-Understand
Silk Flower Centerpiece Arranging COURSE
Check out The Silk Flower Centerpiece Handbook: A Course FOR IMPATIENT PEOPLE — you'll be glad you did!
For More Silk Flower Centerpiece Ideas and Advice:
If you need some help with a floral color scheme, visit this easy guide to spectacular
color combination ideas.
If you want more wedding flower decoration suggestions and tips, visit this article on
easy silk wedding flower ideas.
More FREE Silk Flower Centerpiece Coaching!
Sign up now for Silk Flower Smart NEWS to receive email notification about NEW silk flower crafts instructions and articles, floral product reviews and recommendations from Silk-Flower-Smart.com.It's FREE! Don't miss out — sign up now!
Return from Five Step Silk Floral Centerpiece page
to Silk-Flower-Smart home page
Copyright © 2003-2023 Silk-Flower-Smart.com. All rights reserved.
Unauthorized duplication or publication of any
materials from this Site is expressly prohibited.
